Kalkulator czasu pogłosu
Instrukcja korzystania z kalkulatora czasu pogłosu Rigips
Poniższa instrukcja ma za zadanie zapoznać, pokazać możliwości i ułatwić korzystanie z kalkulatora czasu pogłosu Rigips. Kalkulator służy do obliczania chłonności akustycznej i czasu pogłosu w pomieszczeniach, a tym samym do określania warunków pogłosowych w tych pomieszczeniach. W szczególności odnosi się do wymagań zawartych w normie PN-B-02151-4 „Wymagania dotyczące warunków pogłosowych i zrozumiałości mowy w pomieszczeniach oraz wytyczne prowadzenia badań”.
Kalkulator działa w oparciu o wzór Sabine’a i może być stosowany do szacowania czasu pogłosu w typowych pomieszczeniach, uwzględniając wszystkie ograniczenia teorii Sabine’a, jak np. idealnie rozproszone pole akustyczne czy dość równomierne rozłożenie materiałów dźwiękochłonnych. Zaznaczamy, ze ten program nie jest odpowiedni do obliczeń w salach teatralnych, kinowych, koncertowych i w dużych, otwartych salach o nietypowym kształcie. Program nie nadaje się również do obliczeń dla okrągłych i owalnych pomieszczeń. W takich przypadkach konieczna jest konsultacja akustyka.
Tak więc ten kalkulator można stosować do określania warunków pogłosowych w salach szkolnych, przedszkolach, salach konferencyjnych, biurach, korytarzach, pomieszczeniach hotelowych, szpitalnych i tym podobnych pomieszczeniach o niezbyt skomplikowanym kształcie.
Kliknij aby powiększyć
-
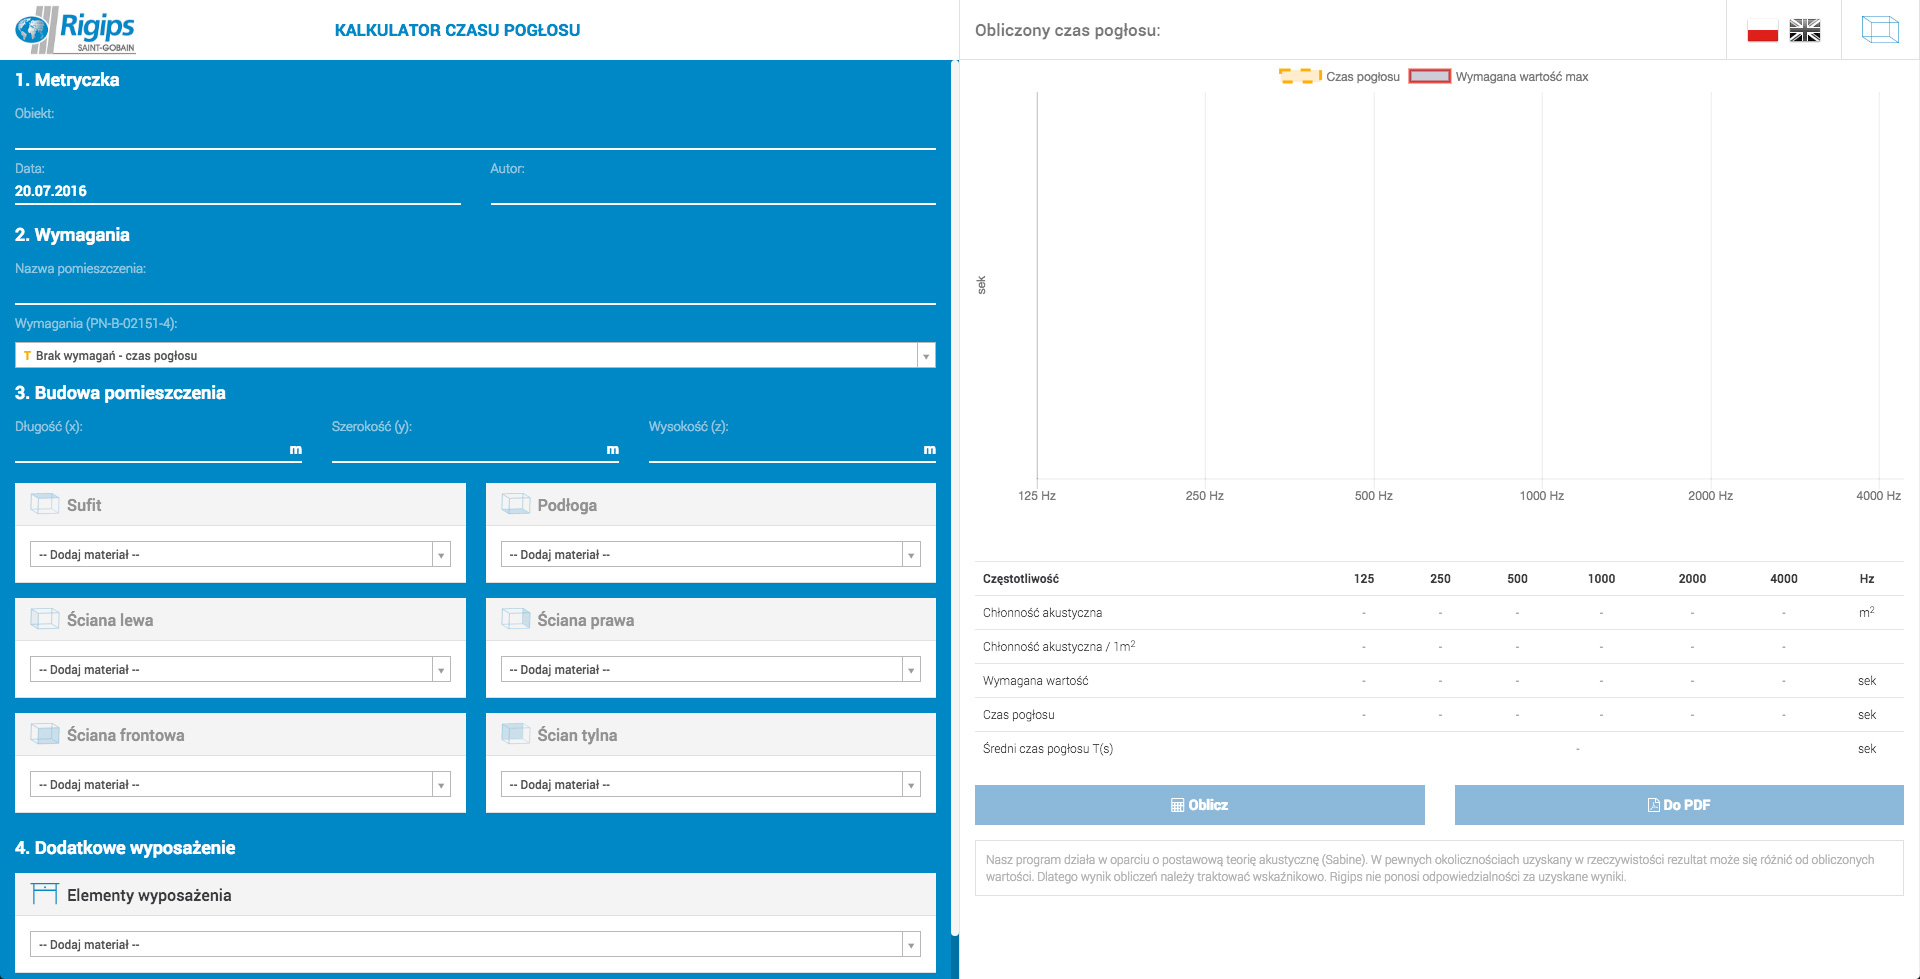
Tak wygląda ekran startowy kalkulatora. Po lewej stronie ekranu, na niebieskim tle znajduje się obszar do wpisania danych przez użytkownika. Po prawej stronie znajduje się tabela z wynikami obliczeń i będzie się tworzył wykres czasu pogłosu (lub chłonności akustycznej) w funkcji częstotliwości. Pod tabelą znajdują się dwa przyciski:
"Oblicz" – służy do przeliczenia wstawionych danych (zwykle przeliczenie następuje automatycznie po każdej zmianie)
Do PDF – służy do zapisania i/lub wydrukowania wyników obliczeń w postaci pliku PDF
W górnym prawym rogu ekranu znajdują się przyciski umożliwiające wybór pomiędzy językiem polskim i angielskim (oznaczone symbolami flag) oraz przycisk oznaczony „sześcianem” służący do pokazania lub ukrycia modelu pomieszczenia w wersji 3D.
Na samej górze lewej (niebieskiej) części ekranu mamy obszar oznaczony „1. Metryczka”. Możemy tam wpisać nazwę obiektu (np. Szkoła Podst nr 5), datę (domyślnie wpisuje się bieżąca) i autora opracowania.
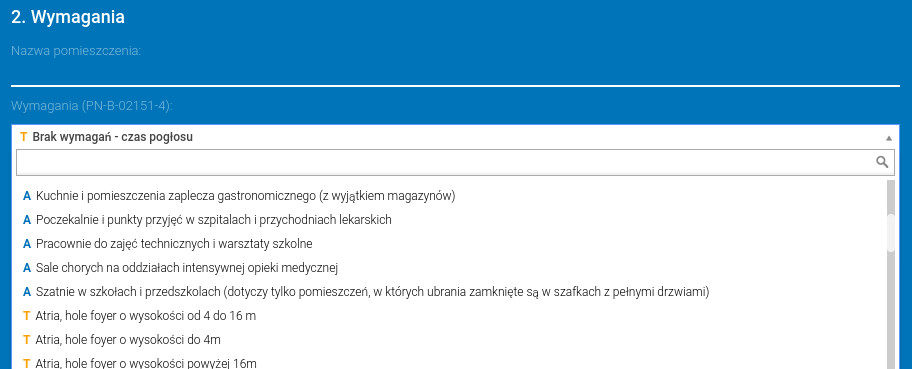
Poniżej znajduje się obszar oznaczony „2. Wymagania”. Wpisujemy nazwę pomieszczenia (np. klasa IIB) – jest to ważne ze względu na późniejsze zapisywanie pliku. Nazwa pliku PDF będzie kombinacją nazwy obiektu i pomieszczenia. Poniżej mamy listę rozwijalną pomieszczeń, co do których zostały określone wymagania w normie PN-B-02151-4. Wybieramy jedno z nich, właściwe lub najbliższe funkcją dla obliczanego pomieszczenia. Ponieważ norma określa wymagania co do maksymalnego czasu pogłosu dla części pomieszczeń, a co do minimalnej chłonności akustycznej dla innych, to dla ułatwienia pomieszczenia te zostały oznaczone na początku nazwy symbolami „T” (czas pogłosu) lub „A” (chłonność akustyczna) przed nazwą. Kalkulator umożliwia też obliczenie czasu pogłosu lub chłonności akustycznej bez odnoszenia się do jakichkolwiek wymagań – należy wtedy wybrać z listy opcję „Brak wymagań – czas pogłosu” lub „Brak wymagań – chłonność akustyczna”. W takim przypadku na wykresie pojawi się tylko jedna krzywa.
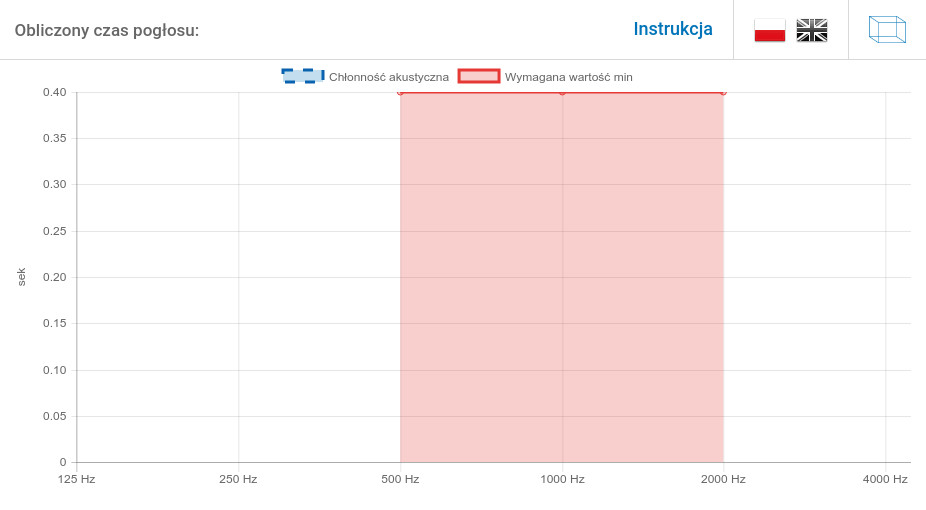
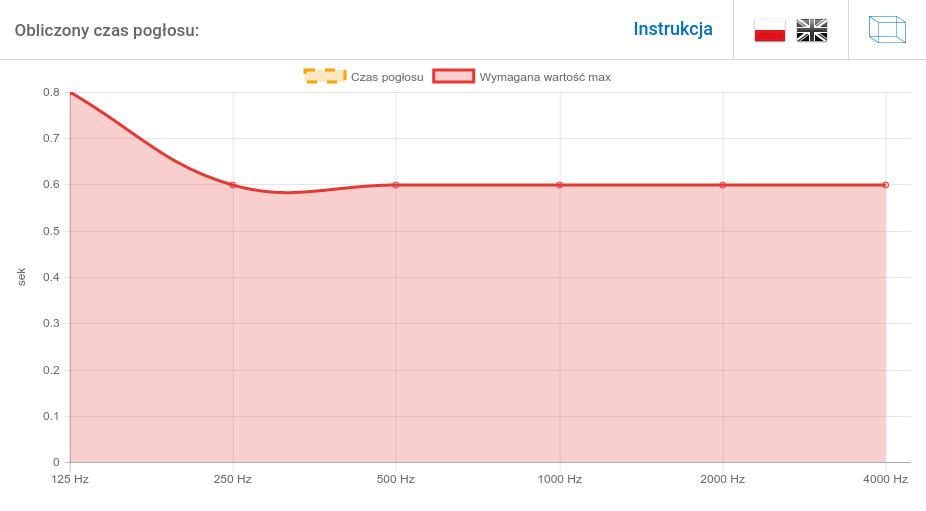
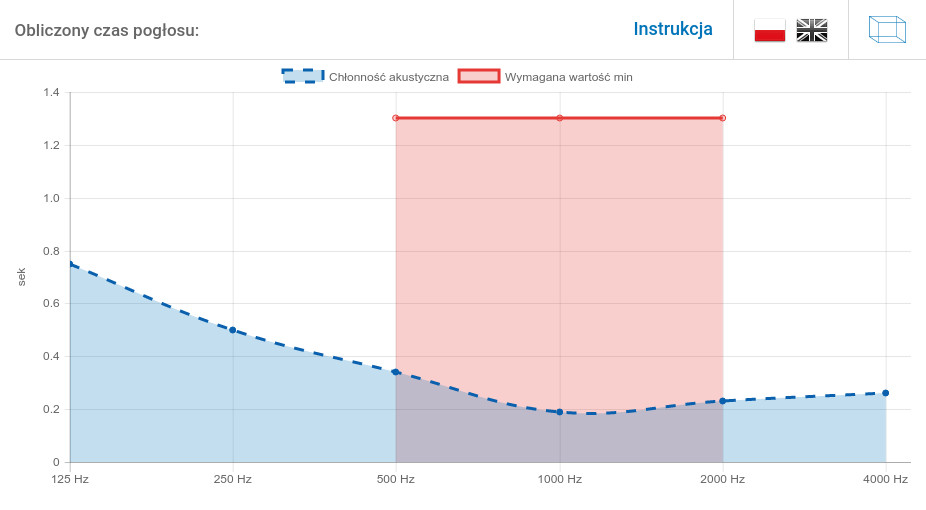
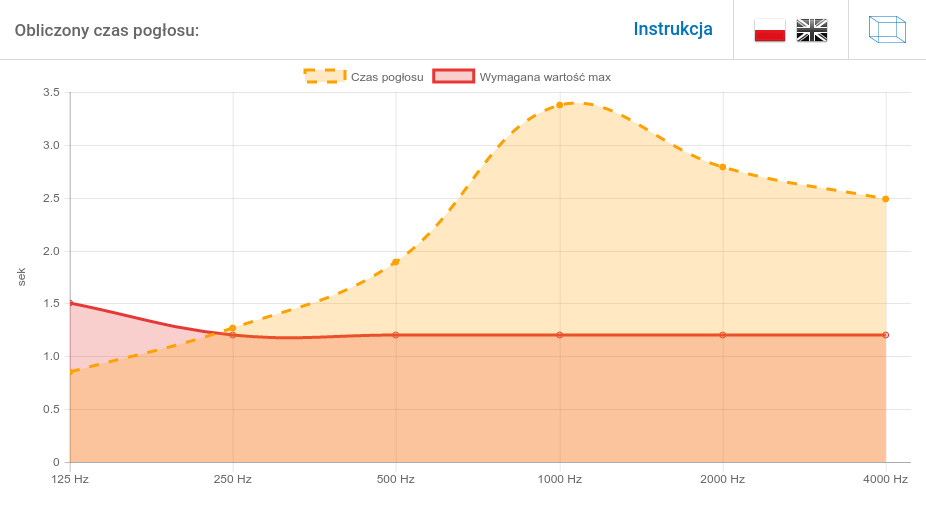
Po wybraniu pomieszczenia pojawi się automatycznie wykres wymaganej minimalnej chłonności akustycznej (jeśli wybraliśmy pomieszczenie z symbolem A) lub maksymalnego czasu pogłosu (jeśli wybraliśmy pomieszczenie z symbolem T). Wymagania odnośnie czasu pogłosu dotyczą wszystkich 6 pasm oktawowych od 125 do 4000 Hz. Wymagania odnoście chłonności dotyczą tylko częstotliwości środkowych 500, 1000 i 2000 Hz i dlatego w tym przypadku wykres jest „niepełny”.
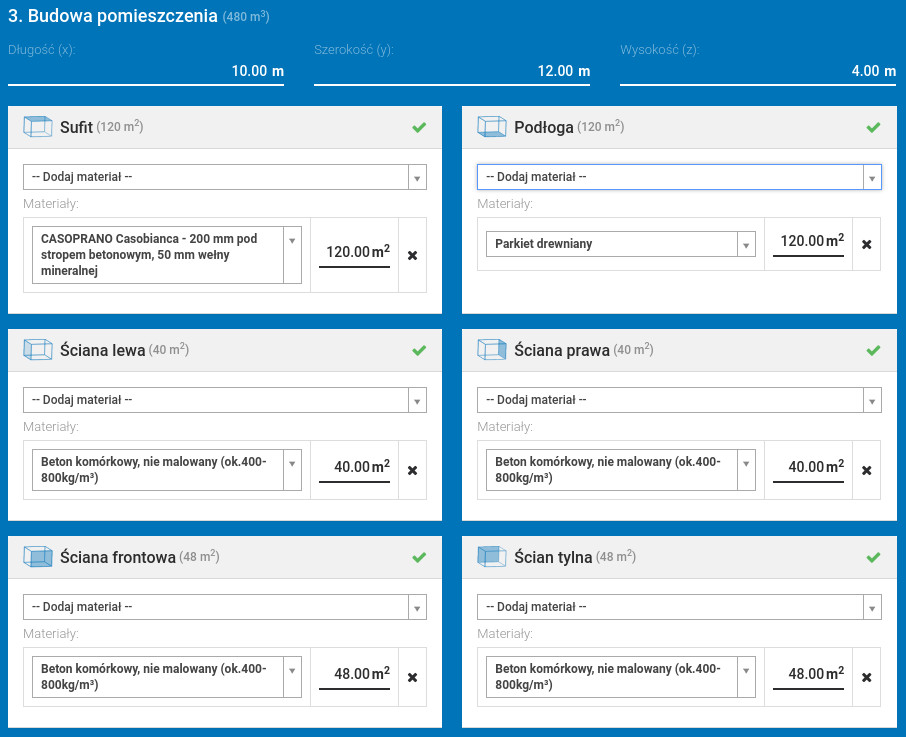
Kolejnym krokiem jest wpisanie wymiarów pomieszczenia w obszarze „3. Budowa pomieszczenia”. Wymiary wpisujemy w metrach, program stosuje zaokrąglenia liczb do 0,01 metra. Po wpisaniu wymiarów program przypisze odpowiednie wielkości poszczególnym powierzchniom: sufit, podłoga i ściany. Wielkości te pojawią się poniżej przy nazwach poszczególnych płaszczyzn. Program automatycznie pilnuje zgodności wymiarów z zadeklarowanymi wielkościami płaszczyzn – nie da się wpisać więcej lub mniej sumarycznej powierzchni płaszczyzny niż wynika to z wymiarów. Dla przykładu – jeśli lewa ściana składa się z okna, drzwi, częściowo płyty GK i częściowo płyty perforowanej, to suma ich powierzchni musi być zgodna z wymiarami – program będzie automatycznie korygował te wielkości.
Kolejnym krokiem jest przypisanie odpowiednich materiałów wykończeniowych do poszczególnych płaszczyzn: sufitu, podłogi i ścian. Materiały wybieramy z list rozwijalnych „—Dodaj materiał—„. Po wpisaniu części nazwy program będzie nam podpowiadał odpowiednie materiały (przyspiesza to wyszukiwanie). Dla każdej płaszczyzny możemy dodać dowolną ilość materiałów. Przy dodawaniu drugiego i kolejnych materiałów program automatycznie podzieli powierzchnię płaszczyzny na równe wielkości. Potem każdą wielkość możemy skorygować „ręcznie”, a program automatycznie skoryguje pozostałe powierzchnie materiałów. Każdy materiał możemy również usunąć za pomocą przycisku „” znajdującego się po prawej stronie listy materiałów. Poprawność wstawionych danych program potwierdzi przez pojawienie się zielonego symbolu „” przy nazwie płaszczyzny. W przypadku błędu pojawi się symbol i odpowiedni komunikat, a pole danej płaszczyzny zmieni kolor na czerwony (obrazek).
ŚCIANY – po przypisaniu materiału dla pierwszej ściany program „domyślnie” dopisze ten materiał dla pozostałych ścian. Potem możemy dany materiał zastąpić innym, zmienić jego wielkość i dodać inny materiał.
OKNA i DRZWI – są jednym z materiałów wykończeniowych ścian i znajdują się na liście materiałów do ścian. Należy je dodać z listy na odpowiedniej ścianie. Przy dodawaniu okien i drzwi program wprowadza domyślnie wielkość powierzchni 2 m2, pilnując automatycznie sumy powierzchni. Wielkość można zmienić „ręcznie”.
Po prawidłowym wpisaniu danych wszystkich powierzchni pojawi się na wykresie druga krzywa – czasu pogłosu lub chłonności akustycznej oraz wyniki obliczeń w tabeli. Pojawi się też właściwy komunikat o spełnieniu bądź nie wymagań normy PN-B-02151-4
Ostatnim krokiem naszych obliczeń może być (nie jest to wymagane) wprowadzenie elementów wyposażenia, takich jak meble, krzesła, zasłony, ludzie, itp. Elementy wyposażenia wybieramy z rozwijalnej listy w najniższym okienku, opisanym „4. Dodatkowe wyposażenie”. Po wybraniu elementu wyposażenia z listy nie przypisuje się automatycznie żadna wielkość powierzchni. Pojawi się komunikat o błędzie, który przypomina nam o konieczności „ręcznego” wpisania wielkości powierzchni wyposażenia.
Wyniki naszych obliczeń możemy zapisać i wydrukować, generując plik PDF. W tym celu należy kliknąć przycisk „Do PDF”. Program zapyta nas o opcję otwarcia lub zapisania pliku. Po otwarciu i sprawdzeniu możemy go wydrukować i/lub zapisać zmieniając nazwę i lokalizację. Po wybraniu opcji „Zapisz” program bezpośrednio zapisze plik pod nazwą będącą kombinacją nazwy obiektu i pomieszczenia (w naszym przypadku będzie to „Szkoła Podst nr 5 – Klasa IIB”) w folderze zgodnym z ustawieniami wyszukiwarki internetowej. W przypadku zmiany materiałów w kolejnych wersjach obliczeń (nazwy obiektu i pomieszczenia pozostają takie same) program będzie tworzył pliki o tej samej nazwie i kolejnych wersjach.
Wizualizacja pomieszczenia – klikając w przycisk w górnym prawym rogu ekranu, oznaczony „sześcianem” możemy otworzyć dodatkowe okno z „trójwymiarową” wizualizacją pomieszczenia. Na wybranych ścianach będą znajdować się drzwi i okna, niektóre elementy wyposażenia też będą widoczne. Bryłę pomieszczenia można dowolnie obracać i „oglądać” z każdej strony. Ponowne kliknięcie w przycisk z „sześcianem” zamknie okno z wizualizacją. UWAGA: W przypadku przeglądarki Internet Explorer wizualizacja może być niewidoczna lub częściowo widoczna, zależnie od wersji programu i stanu aktualizacji

Kliknij aby powiększyć
Kliknij aby powiększyć
Kliknij aby powiększyć

Kliknij aby powiększyć

Kliknij aby powiększyć

Kliknij aby powiększyć

Saint-Gobain Construction Products Polska sp. z o.o
Ul. Okrężna 16 • 44-100 Gliwice • Tel. +48 32 339 63 00 • www.rigips.pl
Sąd Rejonowy w Gliwicach, X Wydział Gospodarczy pod numerem KRS: 0000086064
Kapitał zakładowy: 314 627 500 PLN • NIP: 522-01-01-585